2019.07.11
#マークアップ
梅雨ですね。ジメジメしてますね。
梅雨のせいなのか歳のせいなのかわかりませんが、
最近、体のダルさが中々取れなくなってきた、山田です。
突然ですが楽天でお買い物の際に
いや、楽天に限らず、(Amazonは問題なしかも。)
「さぁ、目星も付いたし、買い物カゴに入れるぜっ!」
と画面を進めていき、カラーを選ぶ最後の項目選択画面で、
「あれ・・・。カラー名なんだったっけ?」
「これで合ってたっけ?・・。」
と、不安がよぎってしまい、最後の最後で何度も商品ページのカラー部分と
選択する部分を行き来したことないですか?
(10カラー以上は特に・・・。)
買い物カゴに入れる直前に画像があればもっと分かりやすいのに・・・。
とか思いません!?思いますよね?(←押し付けがましい)
ということで今回は、そんなお悩みを一発解消できるTipsをご紹介します!
ま、そりゃそうですよね。
項目選択肢に手間ひまをかけるわけですから、先に知っておきたい気持ちもわかります。
私としては、商品名が難しい場合やカラーバリエーションが多い場合は
メリットがあるんじゃないかと思っています。
例えば・・・
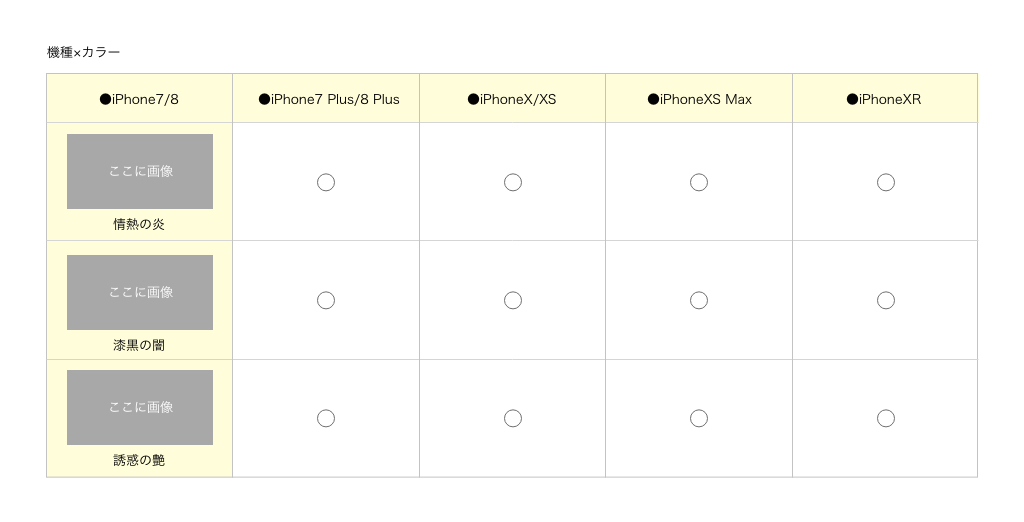
・情熱の炎(レッド)
・漆黒の闇(ブラック)
・誘惑の艶(ピンク)
なんてカラー名だと、ほらややこしいじゃないですか。
(あくまでもイメージです。私はいたって正常です。)
そのほかにも上の様なカラー名が例えば、
10個あった時のことを想像してみてください・・・。
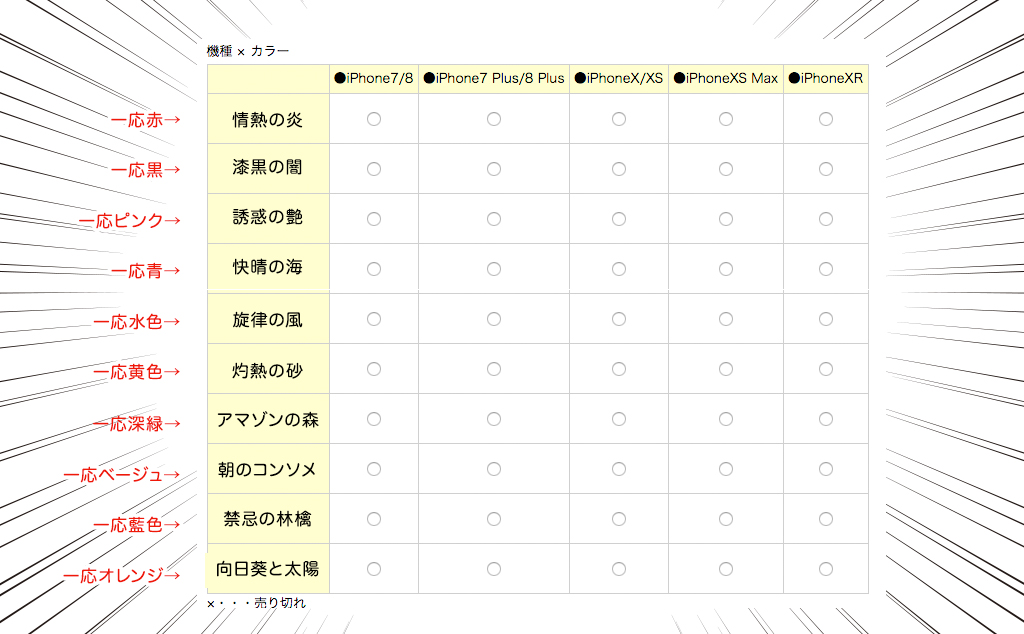
こうなるわけですよ。
レベル高くないですか?
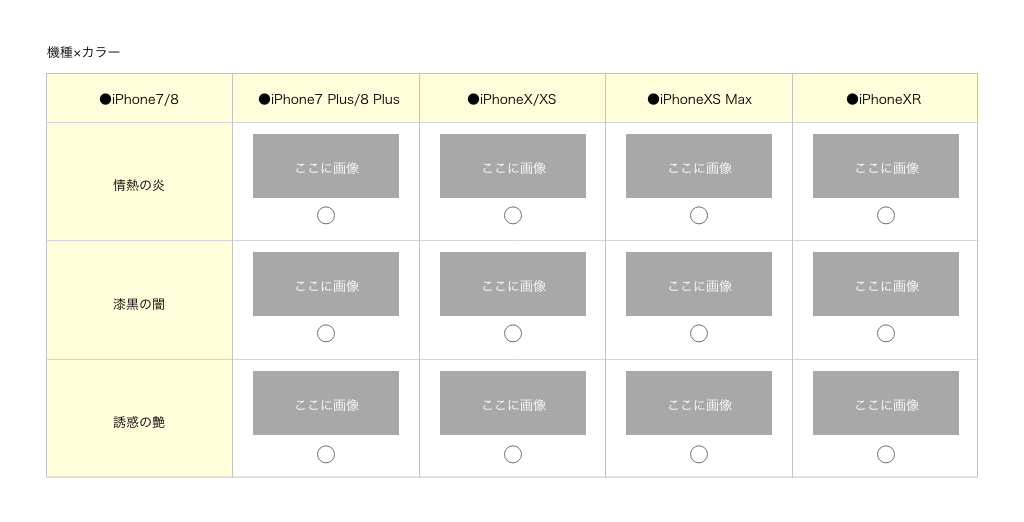
そこで、こんな感じで画像を出してみます。
わかりやすいっ!
今回はCSSを使って、ゴニョゴニョサイトを変えていきます。
それでは早速手順を公開します!
まずは下記のようなCSSを用意してください。
|
1 2 3 4 5 6 7 8 9 10 11 12 13 14 15 16 17 18 19 20 21 22 23 24 25 26 27 28 29 30 31 32 33 34 35 36 37 |
<style type="text/css"> /* 横軸に名前を出すCSS ---------------------------------- */ #rakutenLimitedId_aroundCart tr tr tr:first-child .inventory_choice_name span:before { content: ""; display: block; width: 120px; /*画像の幅*/ height: 80px; /*画像の高さ*/ background-size: 120px; /*画像の幅*/ margin:4px 0; /*任意で変更してください*/ } /* 1つ目 */ #rakutenLimitedId_aroundCart .inventory_choice_name:nth-child(1) span:before { background-image:url("ここに表示させたい画像のURL"); } /* 2つ目 */ #rakutenLimitedId_aroundCart .inventory_choice_name:nth-child(2) span:before { background-image:url("ここに表示させたい画像のURL"); } /* 3つ目 */ #rakutenLimitedId_aroundCart .inventory_choice_name:nth-child(3) span:before { background-image:url("ここに表示させたい画像のURL"); } /* 4つ目 */ #rakutenLimitedId_aroundCart .inventory_choice_name:nth-child(4) span:before { background-image:url("ここに表示させたい画像のURL"); } /* 5つ目 */ #rakutenLimitedId_aroundCart .inventory_choice_name:nth-child(5) span:before { background-image:url("ここに表示させたい画像のURL"); } </style> |
|
1 2 3 4 5 6 7 8 9 10 11 12 13 14 15 16 17 18 19 20 21 22 23 24 25 26 27 28 |
<style type="text/css"> <!-- /* 縦軸に名前を出すCSS ---------------------------------- */ #rakutenLimitedId_aroundCart tr tr tr:not(:first-child) .inventory_choice_name span:before { content: ""; display: block; width: 120px; /*画像の幅*/ height: 80px; /*画像の高さ*/ background-size: 120px; /*画像の幅*/ margin:4px 0; } /* 1項目目 ※1つ目はタイトルになるので、nth-childは「2」から */ #rakutenLimitedId_aroundCart tr tr tr:nth-child(2) .inventory_choice_name span:before { background-image:url("ここに表示させたい画像のURL"); } /* 2項目目 */ #rakutenLimitedId_aroundCart tr tr tr:nth-child(3) .inventory_choice_name span:before { background-image:url("ここに表示させたい画像のURL"); } /* 3項目目 */ #rakutenLimitedId_aroundCart tr tr tr:nth-child(4) .inventory_choice_name span:before { background-image:url("ここに表示させたい画像のURL"); } --> </style> |
さて、ちょっとややこしいですが・・・。
各項目に画像を出す場合は下記のCSSを追加します。
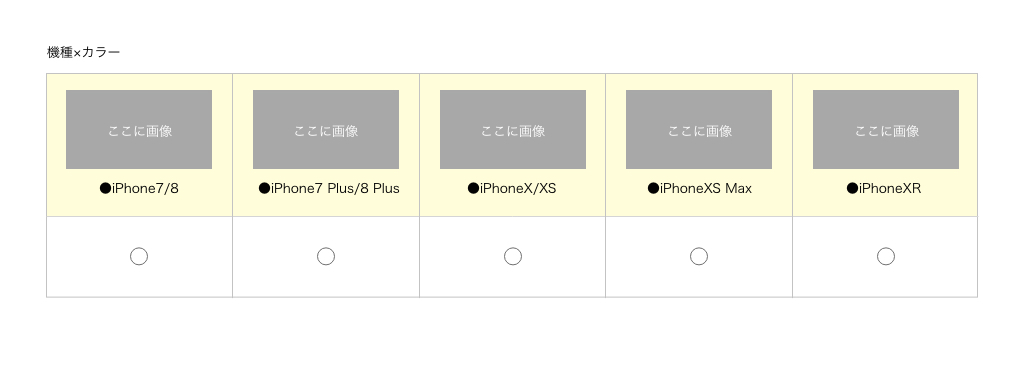
※下記のソースコードはPCの場合となります。
スマホに関しては、縦軸のみまたは、横軸のみのCSSでOKです!
|
1 2 3 4 5 6 7 8 9 10 11 12 13 14 15 16 17 18 19 20 21 22 23 24 25 26 27 28 29 30 31 32 33 34 35 36 37 38 39 40 41 42 43 44 45 46 47 48 49 50 51 52 53 54 55 56 57 58 59 60 61 62 63 64 65 66 67 68 69 70 71 72 73 74 75 76 77 78 79 80 81 82 83 84 85 86 87 88 89 90 91 92 93 94 95 96 97 98 99 100 101 102 103 104 105 106 107 108 109 110 111 112 113 114 115 |
<!--項目選択肢CSS--> <style type="text/css"> /* 縦軸と横軸に名前を出すCSS ---------------------------------- */ #rakutenLimitedId_aroundCart tr tr tr:not(:first-child) .inventory_choice_name span:before { content: ""; display: block; background-size: 100px; /*画像の幅*/ margin-bottom: 4px; } #rakutenLimitedId_aroundCart input.sku_radio_unify, #rakutenLimitedId_aroundCart input.sku_radio_only { position: absolute; bottom: -4px;right: 15px;}/*ラジオボタンの位置*/ #rakutenLimitedId_aroundCart .sku_inventory_unify{position: absolute;bottom: 5px;right: 50px;} #pagebody .inventory{position: relative;} span.inventory_soldout{position: absolute; bottom: 0;right: 15px;} /* --------1行目-------- */ /* 1行目の1列目 */ #rakutenLimitedId_aroundCart tr tr tr:nth-child(2) .inventory:nth-child(2) { background-image:url("ここに表示させたい画像のURL"); background-size: 100px; /*画像の幅*/ background-repeat: no-repeat; background-position: -9px 8px; /*画像を表示させる場所*/ height: 140px; /*画像の高さ*/ } /* 1行目の2列目 */ #rakutenLimitedId_aroundCart tr tr tr:nth-child(2) .inventory:nth-child(3) { background-image:url("ここに表示させたい画像のURL"); background-size: 100px; /*画像の幅*/ background-repeat: no-repeat; background-position: -9px 8px; /*画像を表示させる場所*/ height: 140px; /*画像の高さ*/ } /* 1行目の3列目 */ #rakutenLimitedId_aroundCart tr tr tr:nth-child(2) .inventory:nth-child(4) { background-image:url("ここに表示させたい画像のURL"); background-size: 100px; /*画像の幅*/ background-repeat: no-repeat; background-position: -9px 8px; /*画像を表示させる場所*/ height: 140px; /*画像の高さ*/ } /* --------2行目-------- */ /* 2行目の1列目 */ #rakutenLimitedId_aroundCart tr tr tr:nth-child(3) .inventory:nth-child(2) { background-image:url("ここに表示させたい画像のURL"); background-size: 100px; /*画像の幅*/ background-repeat: no-repeat; background-position: -9px 8px; /*画像を表示させる場所*/ height: 140px; /*画像の高さ*/ } /* 2行目の2列目 */ #rakutenLimitedId_aroundCart tr tr tr:nth-child(3) .inventory:nth-child(3) { background-image:url("ここに表示させたい画像のURL"); background-size: 100px; /*画像の幅*/ background-repeat: no-repeat; background-position: -9px 8px; /*画像を表示させる場所*/ height: 140px; /*画像の高さ*/ } /* 3行目の3列目 */ #rakutenLimitedId_aroundCart tr tr tr:nth-child(3) .inventory:nth-child(4) { background-image:url("ここに表示させたい画像のURL"); background-size: 100px; /*画像の幅*/ background-repeat: no-repeat; background-position: -9px 8px; /*画像を表示させる場所*/ height: 140px; /*画像の高さ*/ } /* --------3行目-------- */ /* 3行目の1列目 */ #rakutenLimitedId_aroundCart tr tr tr:nth-child(4) .inventory:nth-child(2) { background-image:url("ここに表示させたい画像のURL"); background-size: 100px; /*画像の幅*/ background-repeat: no-repeat; background-position: -9px 8px; /*画像を表示させる場所*/ height: 140px; /*画像の高さ*/ } /* 3行目の2列目 */ #rakutenLimitedId_aroundCart tr tr tr:nth-child(4) .inventory:nth-child(3) { background-image:url("ここに表示させたい画像のURL"); background-size: 100px; /*画像の幅*/ background-repeat: no-repeat; background-position: -9px 8px; /*画像を表示させる場所*/ height: 140px; /*画像の高さ*/ } /* 3行目の3列目 */ #rakutenLimitedId_aroundCart tr tr tr:nth-child(4) .inventory:nth-child(4) { background-image:url("ここに表示させたい画像のURL"); background-size: 100px; /*画像の幅*/ background-repeat: no-repeat; background-position: -9px 8px; /*画像を表示させる場所*/ height: 140px; /*画像の高さ*/ } </style> <!--項目選択肢CSS--> |
ちょっとややこしいですね。。
列や行は項目数によって変更してください。
あと、もっといい方法があれば教えてください(笑)
さ、というわけでCSSの準備が用意できたら次は実際にRMSに入れてみましょう!
画像の項目はいくつでもOK!(数に合わせてCSSを調整してください)
まず、用意した画像を「R-Cabinetもしくは楽天GOLD」にアップロードしてください。
アップロード後、
先ほどのCSSをコピーして、エディタなどで編集します。
メモ帳でも構いません。
で、「ここに表示させたい画像のURL」の部分に表示させたい画像urlを記載して、
サイズ(高さや幅)を調整してください。
作成したCSSを商品ページの「PC用商品説明文」に貼り付けてください。
ここで1つ注意!
ヘッダーなどの共通説明の部分に貼ってしまうと、全商品に同じ画像が表示されてしまいます・・・!
(エライコッチャ・・・)
というわけで、商品数などが多い場合は少し大変ですが、商品ページ1つ1つの「PC用販売説明文」に必ず貼り付けるようにしてください。
そうですよね、今はスマホが主流なので、スマホはどうするのか気になるところ。
しかもスマホの「スマートフォン用商品説明文」は、なななんとっ!
「やっぱPCだけか。」
とちょっと待ってください!
スマホでもCSSは使えるんですっ!
続きは、次回山田の
の記事にてご紹介させていただきます。
いかがでしたか?
今回はPCのみのご紹介でしたが、項目選択肢に画像を入れることができると、
商品選択がわかりやくなり、お客様も選びやすさUP!
さらには転換率もUPするのではないでしょうか!?
ぜひ一度お試しください。
それでは、今回はこのあたりで。